 |
|
| |
 |
Building |
|
 |
 |
| |
Image corrections with Gimp |
| |
|
|
|
 |
|
| Here we will not show complicated methods to make image corrections, but only the most obvious and most useful ones. |
| Gimp has a Clone Stamp Tool, which you can find also in other texturing programs. |
| We will show you some corrections with the masked pictures that we have seen on the previous web pages (47+48) |
| We will see how to copy, move and rotate image parts and how to join them together. |
| We will see how to modify colours and how to make perspective corrections. |
| And finally also about how to change the image pixel size. |
|
 |
|
|
| The Clone Stamp Tool |
We load the mapleleaf.png image into Gimp , and we want to remove the black spot at the top of the leaf. We select the Clone Stamp Tool, and double-click to see the options: we can edit the clone stamp size to 40 , and to avoid hard edges with the clone stamp, we also choose fuzzy clone ( with less hardness). Now you move your mouse to the spot that you want to clone from. You see a dotted circle when you hover with your mouse. Press the CTRL-key to fix the spot, and you will see that the dotted circle remains "fixed" on that spot. |
| Now you will see a second dotted circle , and move this second circle to the black spot on the leave that you want to remove and now just click with your mouse upon the black spot. Move your mouse a little bit and click again, and the black spot is removed in 2 mouseclicks !! Now export again as a .png image. |
| If you cloned by mistake : CTRL+Z to undo , but you can also redo with CTRL+Y. |
|
 |
|
|
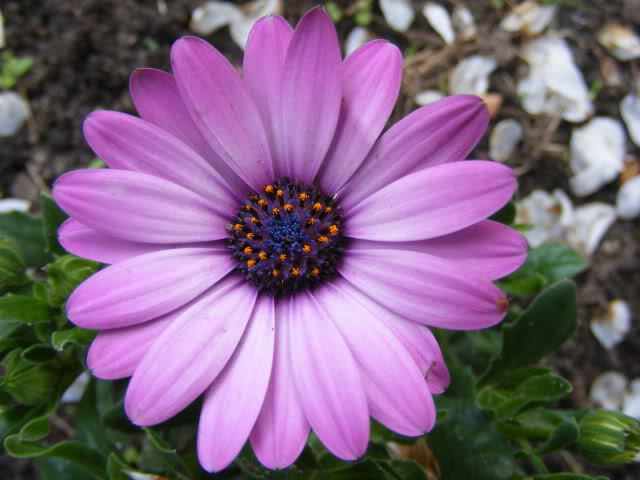
| Aligned cloning |
| A second example is with this osteospermum flower. |
| Instead of using a "fixed" Clone Stamp, you can also choose a Clone Stamp "aligned". Go to the Clone Stamp options window and select below the option "aligned". If you choose this, then you will also see the 2 dotted circles, but there the first dotted circle moves simulaneous and parallell with the second dotted circle. This is an easier way of cloning : when you hover with your mouse over the image, you will always see clearly which is the "source image" that you will clone to the spot that needs to be changed. |
| The Repair Tool |
| You also have the Repair Tool (=yellow plaster icon), which works similar to the Clone Stamp Tool. But the repair tool can also clone the background, whereas the Clone Stamp does not do that. |
|
 |
|
|
| Copy, move and rotate image parts |
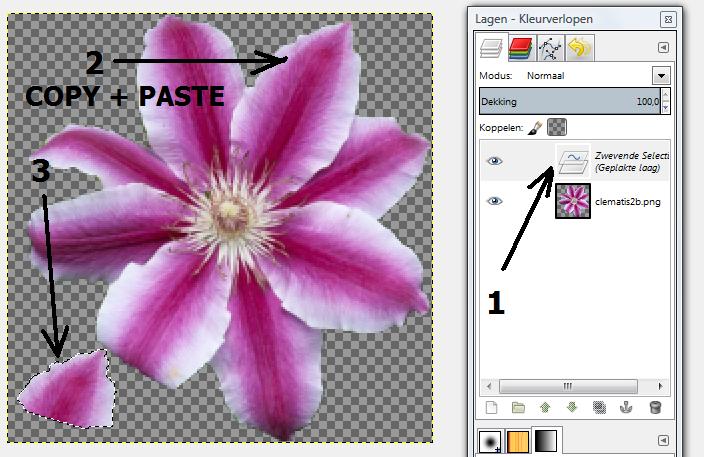
For this example, we use the this clematis flower. As you can see, some flower leaves are not completely visible, we will fix that. We select the Free Selection Tool (= Lasso Tool) and we make anchor point around 1 flower leaf edge that is intact. Close the circle so that you have dotted lines around a flower leaf part. |
| Now you choose: Edit - Copy and then also : Edit - Paste. Instead of using the Lasso Tool, you can also use the Rectangle Tool and draw a rectangle around the leaf part, and do Edit>Copy Edit>Pasted, and the result will be (almost) the same. |
| In the layers window, you will see that you have created a new layer (located above the already existing layer). Now go again to the image grab the "leaf part" with your mouse and move this image down to the corner where you have a leaf part missing. |
|
|
|
|
| Now select the Rotate Tool (or in the menu : Layer - Transform - Random rotation.). Now click again upon the flower leaf piece and you will see a grid , and inside the grid you will also see an orange circle. And at the same time you will see the "rotation" window. Now move the orange circle with your mouse to the center of the flower leaf, because this circle is the center point for the rotation that your will make now. In the rotation window, you will see that the values for "middle X" and "middle Y" have changed In the rotation window you also hae "angle", here you type a value for the degree of rotation that you want to make with that layer. But an easier way is by using the slider underneath, and at the same moment you will see in the image that the flower leaf rotates. Finally when you have the correct rotation, click upon "Rotate" . |
|
 |
|
|
 |
 |
|
|
| Next thing to do, is move the flower piece : click upon the Move Tool and grab the flower piece with your mouse to the place where you have the missing link. When you see that everything fits well, you go to the layers menu, and you select the layer of the flower piece , then right-click and choose "anchor layer". |
| Now the flower piece is joined to the main flower. Now use the ("aligned") Clone Stamp Tool to smoothen up the new leaf part with the rest of the leaf. |
| After this, you can also fix the other leaf that is incomplete. |
| And finally you export the complete flower as a .png file. |
|
 |
|
|
 |
|
|
|
| Modify colours |
We already have talked about "channel masks". In the layers window, you can select the tabsheet "channels", where you have 3 channels for red,blue and green, and there is also the alpha channel for the transparency. By clicking upon 1 or 2 colors , you can exclude them and obtain another clematis flower. On the picture, when you exclude the blue channel, you get this yellow-orangered clematis flower. However, you cannot export this as a new flower image. |
|
 |
|
|
| If you go to the menu and choose "Colours", then you have a wide menu of options. Color balance , color tint , fading , clarity and contrast , desaturate , ...etc., each time a window will open, where you can use sliders to modify the colours, and save them. |
| In the colours menu , we already have seen this in previous tutorial : Colors - Components - Channel Mixer. Move the sliders, and save and you have a new image colour. |
| And what you could not make with the channels in the layers menu , can easily be made here : Colours - Curves , then select the blue channel and then grab with the mouse the blue diagonal line and move this in the the right bottom corner. |
| We export this image with .png extension. |
|
 |
|
|
 |
|
|
|
| Perspective correction |
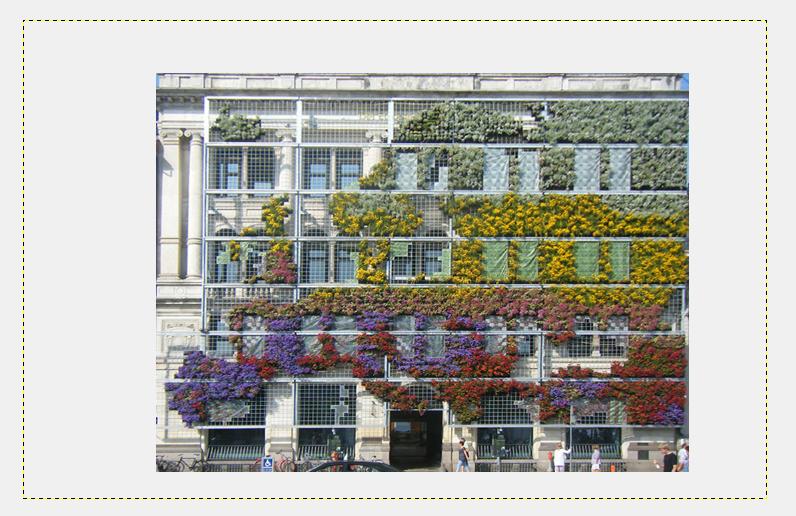
We will remove the perspective from this image. And we will try out 2 methods. |
| Method 1 : The normal direction (=forward) |
| For this method, we reduce the image size with the CRTL+mousewheel. We select the Perspective Tool and double-click for the options. We choose Normal direction (=Forward) , and below the options window , you can choose how many help lines you want. If you have chosen too few or too many help lines, then you can reset to the default options by clicking the icon in the bottom right corner. |
| As soon as you start to click upon the image, you will see the help lines and you will also see a square box in each corner of the image. And you will also see the perspective window with various numbers. |
| Now select 1 of the square boxes and drag the box outside the image, and do the same with the 3 other square boxes, so that the building itself gets rectangular. When the borders of the building are equal to the original image size (of which you can still see the dotted lines), then go to the perspective window and click upon "Transform". And the building will be cut out from the image, into a new image without any perspective. |
|

|
|
|
 |
|
|
|
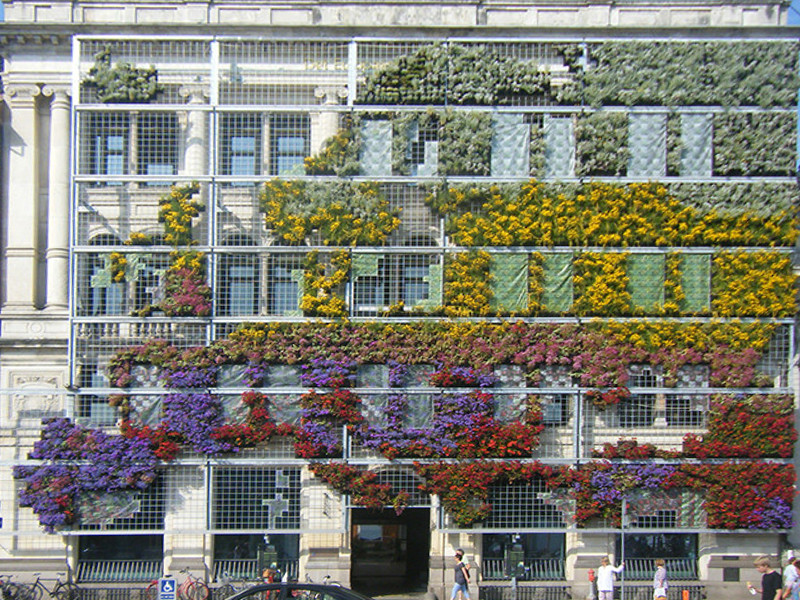
| Method 2 : The correcting direction (=backwards) |
| For this (better and easier) method, we don't need to reduce the image, you can even enlarge the image. Select the Perspective Tool and double-click for the options. This time choose as Direction: "Correcting" (=Backwards) |
| When you click upon the image, you will see again the help lines and the square boxes in each corner of the image. |
| Now click upon the boxes again , but this time you drag the boxes inside the image, and put 1 box upon each corner of the building. Then go to the perspective window and click upon "transform". The building will be cut out from the image, into a new image without any perspective. As you have cut out this new image , you will see the dotted lines of the (larger) original image. Finally , you export this image, in this case : facade2.jpg. This time you can use the extension .jpg, because this image isn't masked. |
|
 |
|
|
 |
 |
|
|
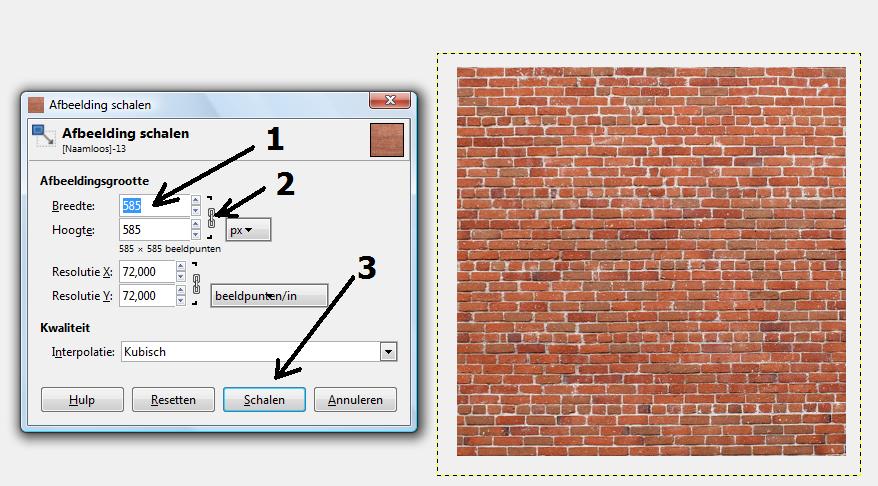
| Image pixel size |
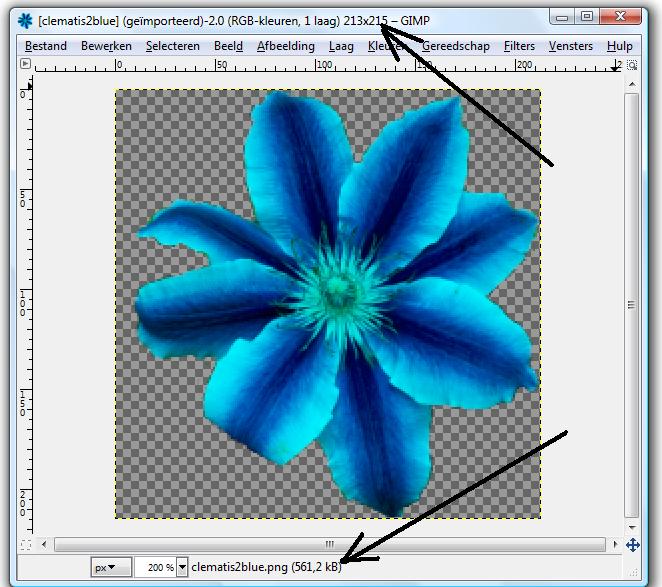
| When using images in Activeworlds , either for building or for modelling, it is better to use images sizes with the powers of 2 , this means pixels sizes 64x64 , 128x128 , 256x256, 512x512 , or a combination of these (128+64=192) -> 192x192 , 128x256 , etc. |
| We choose this clematis flower of which we have modified the colours. At the top of the Gimp window, you see the pixel size : 213x215 pixels , at the bottom of the Gimp window, you see the image size in kb : 569kb.Go to the menu and choose : Image - Image Scale . Now you have the image scale window, and for width you type 256 pixels, then unlock the chain icon , and you can also type 256 pixels for the height. Then click upon "scale", and at the top of the Gimp window, you see now 256x256 pixels. |
| Now you can export this image with extension .png : clematis256blue.png |
| |
| If you would use a rectangular image, then the image will be distorted. In this case, you first cut out the image by going to the menu : Image - Canvas Size. Or use the Rectangular Tool, draw a square around the image and use Edit>Copy and Edit>Paste as: New Image. When the image is "almost" square, you can resize it to the "powers of 2". |
|
|
|
|
 |
|
|
|
| Using a gradient |
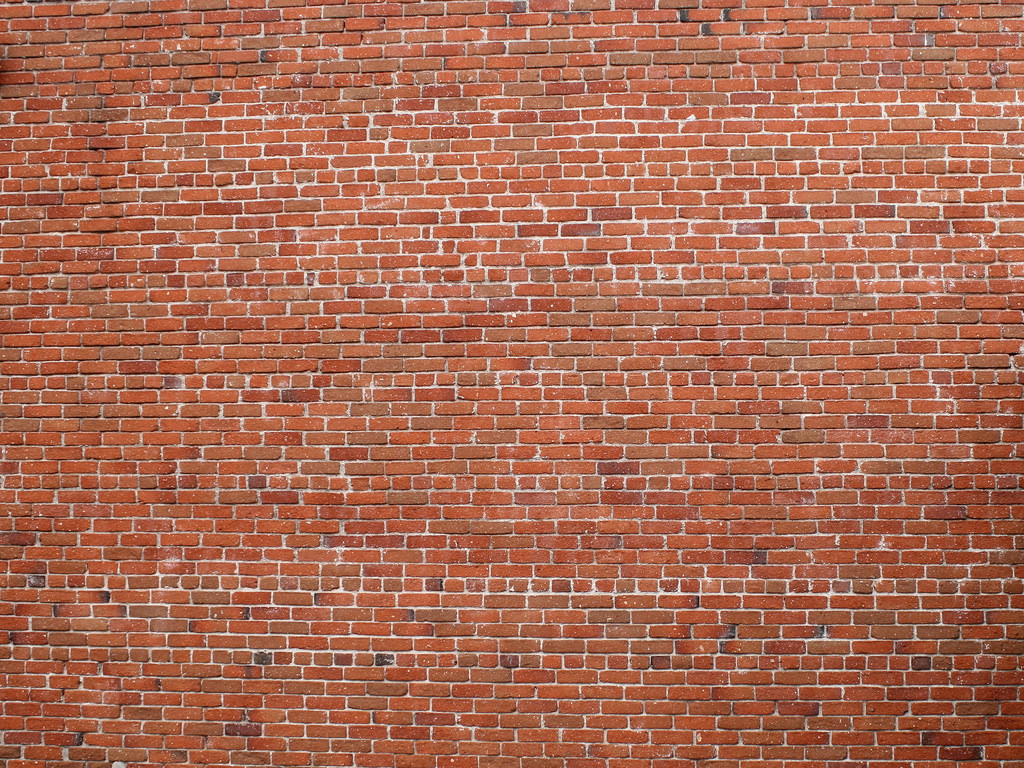
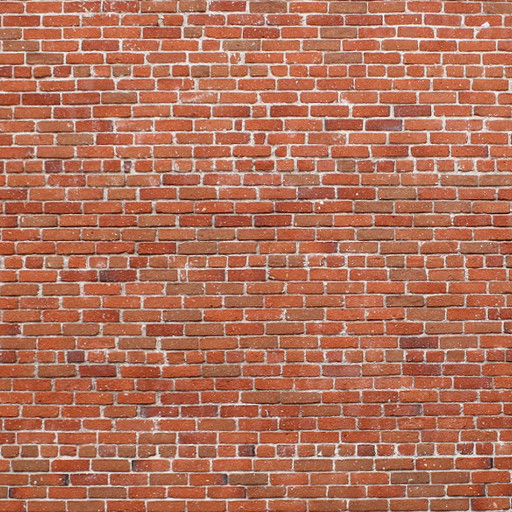
We will use this brickwall. Select the Rectangle Tool . Double-click upon the tool to see the options window, and you "check" the option : "fixed" , and you choose "proportion". Now we can draw a perfect square and we cut this out from the image. Then use the perspective tool, and make the correction so that the bricks match with the upper and lower border line of the picture. Choose in the menu : Image > Image Scale , and scale it down to 512x512 pixels. We export this image : brickw512.jpg. |
|
|
|
|
|
 |
|
|
|
 |
|
|
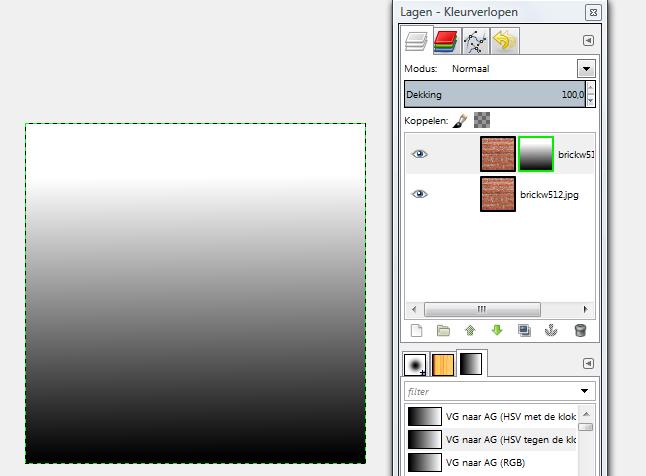
| We see that for this wall , the lower part of the bricks is darker than the upper part. We will fix that now with the gradient tool and darken the upper part of the wall. |
| We go to the layers window and copy the layer. Select the new layer. Go to the menu : Layers - Mask - Add layer mask , then choose : white (not transparant) and press ok. |
| Now select the layer mask and press the ALT key ,and the wall image is replaced by the white layer mask. Go to the toolbox and choose the Gradient Tool. In the layers/gradients window below you choose "FG to BG" (="foreground to background"). |
| Now click at the bottom edge of the white mask image, and draw a line upwards , until halfway, where you want that the gradient has to stop. And automatically the white layer is has now a black/white gradient |
|
 |
|
|
| Press again the ALT-key so that you see the brick wall again. Now click the eye-icon of the layer that contains the brickwall and the gradient layer mask. Go to the menu and choose : Colours > Brightness/Contract , and move the slider of the brightness,so that the brightness is equal for the entire wall and then click OK. |
| Select the other layer, right-click and join all layers : "Flatten Image". |
|
 |
|
|
 |
|
|


