 |
|
| |
 |
Movers |
|
 |
 |
| |
Movers (server controlled) |
| |
|
|
|
 |
|
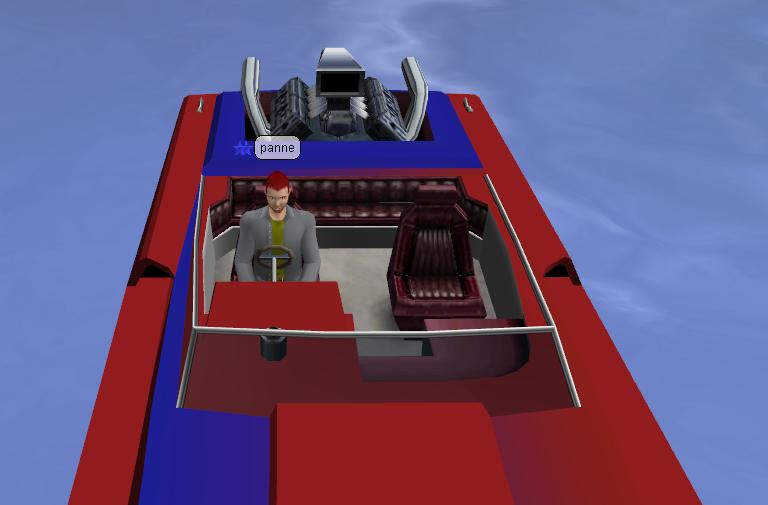
| 1. Preparations (user controlled mover) |
If you want to make a server controlled mover, then you could first start making a user controlled mover : put the mover at the right height and direction , check also if the avatar looks into the right direction. And check for Lock offset (XYZ): 1.30 1.00 -0.80 , which brings the avatar on the seat behind the steering wheel. (see picture 1) |
| Model : sv-jetmax2 |
| Keep on water |
| Lock avatar position |
| Lock offset (XYZ): 1.30 1.00 -0.80 |
| Lock avatar Yaw |
| Locked Yaw (0° to 360°) : 270 |
| Lock avatar pitch |
| Locked pitch (-180° to 180°) : 0 |
| Seq file : qsitmale |
| Now you can start changing the mover into a several controlled mover. |
|
 |
| picture 1 |
|
|
|
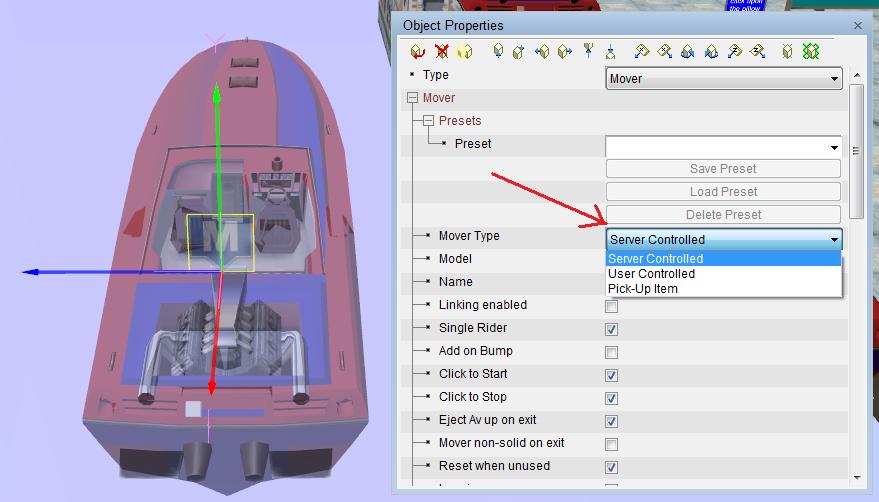
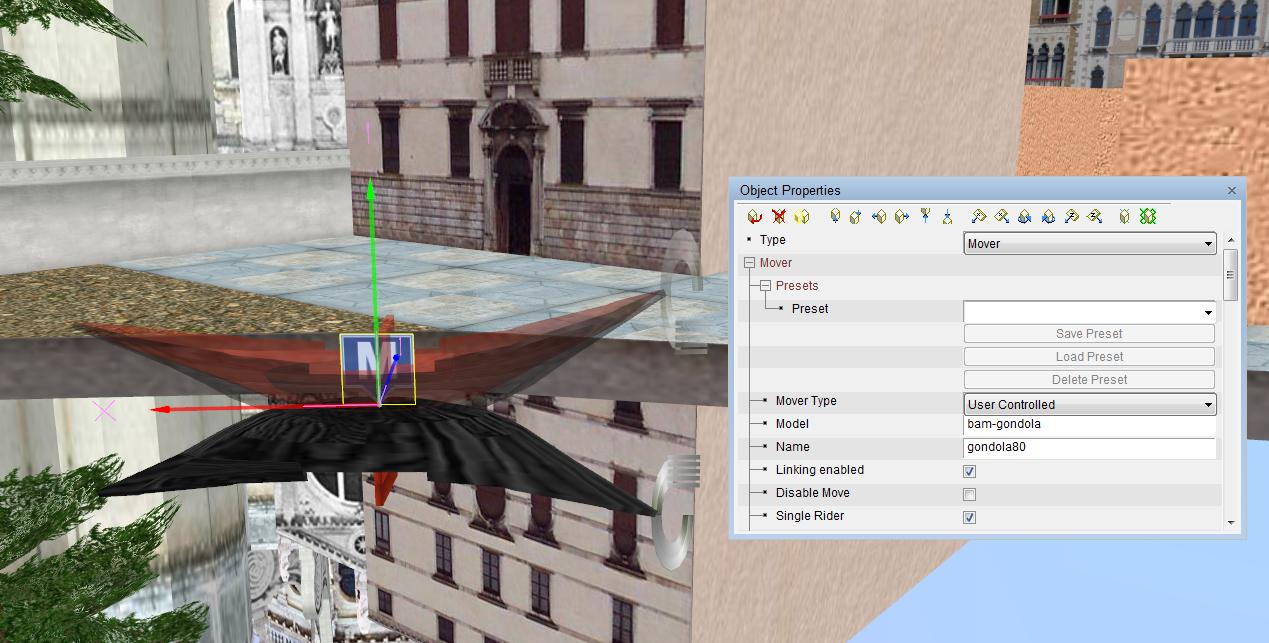
| 2. Start making the server controlled mover |
| Select the Mover-icon to get into the mover object properties window, and we change the "mover type" into "Server controlled". (see picture 2) |
| What happens now is that the mover disappears......Go into building mode again and you see the M-icon and select it again. Go below the menu and select "Edit waypoints". Now you will see a table , with several colums for input. We start making a (random) input in the column X : 1 and for speed : 2. (see picture 3) |
| We close the window and we see that the mover appears again :) . Now we click upon the mover and look how it behaves . We see that the mover is "turning around" and then it stops. Now it is time to build up the waypoints table so that the mover goes into the direction we want. |
| We start with using only the columns X Z and speed. Values in the colums X and Z (for X and Z axis) will bring the mover to the north/east/west/south depending on the input value , a negative value will bring the mover into the opposite direction . Here we don't enter values for Y, because then the boat will move up or down. |
| We add a second waypoint line : X 20 Z -2 speed 2 ,and we test this out again. We see that the mover goes to the west, and we see that the avatar looks forward on the boat; but however the boat itself proceeds navigating on its side. (see picture 4) |
| And there is no way you can find to turn the boat by 90 degrees.....This example shows that this way isn't the correct way.We have to restart with something else ....!!! |
|


|
|
|
| 3. Multiple objects (server controlled mover) |
| We have to make a mover with multiple objects. We change the model name for the boat mover (without deleting the boat mover we have made, otherwise you also need to do step 2 again). And the boat itself will be a model object which will be linked to this mover !!! We can choose between several objects : pole1m02 , pillow1 , soccera1. We use soccera1 , because you can clearly see + select the soccera1 mover object . For a pillow, there isn't enough space for still seeing the steering wheel.We put the soccera-object on the dashboard in front of the steering wheel. |
| Model : soccera1 (instead of sv-jetmax2) |
| Name : navig1 |
| Linking enabled |
| Keep on water |
| Lock avatar position |
| Lock offset (XYZ): 0.00 0 0 (will be fixed later) |
| Lock avatar Yaw |
| Locked Yaw (0° to 360°) : 0 (is zero here instead of 270) |
| Lock avatar pitch |
| Locked pitch (-180° to 180°) : 0 |
| Seq file : qsitmale |
| Model : sv-jetmax2 |
| Create link navig1 |
|
|
 |
| picture 4 |
 |
| picture 5 |
|
|
|
| Now to fix the main problem , so that the boat navigates forward correctly and not on his side. We look first at the waypoints table and we see that the YAW has a "zero" value. (see picture 3). We will change that into 90 by doing the next thing. |
| Select the mover object (soccera object) and we press 6 times upon the PageDown-key , and we will see that the boat (sv-jetmax2) which is linked to the mover , will rotate by 90 degrees. We look now again to the waypoints table and we see that the value of YAW is now 90. (see picture 5) |
| If the value should have been -90 , then you would have to rotate the boat again by 180 degrees to the other side. |
| Next thing is to lock the avatar into the seat behind the steering wheel. (picture 6) The values are for the distance between the soccerbal on the dashboard and the seat. If the soccerbal was located on the seat, then the values would have been 0 here. |
| Lock avatar position |
| Lock offset (XYZ): 0.00 -0.80 -1.25 |
| We test and click upon the mover and we see that the boat goes forward like it should be and that the avatar looks in the right direction too. We see that the mover still turns around at the end , but this is something that we will fix only at the end. Now it's time to start making the waypoints. |
|
 |
| picture 6 |
|
|
|
| 4. Waypoints editor |
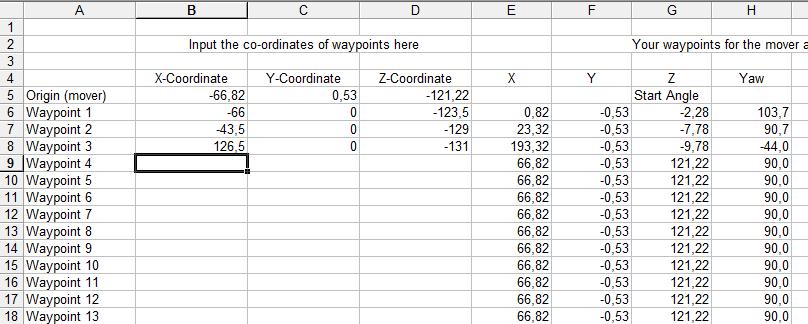
| Let's look at this table example (picture 7) : the values on the first line of X Y and Z-columns are the (starting) position of the mover but indicated in meters (instead of cells). In this case position 12S 6E. |
| We just have seen for the value of YAW-column, that this has to do with the rotation of the object(s) linked with the mover. |
| The values that you will enter finally into this table (beginning at line number 1) are the values compared to the starting position of the mover, and these are indicated in metres (instead of cells). |
| We already have explained : X and Z go horizontal, the Z goes vertically, negative values bring the mover into the opposite direction of the starting position of the mover. |
| Speed will make navigate the boat slower or faster, indicated in meters per second. |
| Pitch will tilt (rotate) the avatar and the mover forward or backwards |
| Roll will tilt (rotate) the avatar and the mover on its side (left or right) |
| Pitch and roll can be used , for example , to make a server controlled rollercoaster. |
| Pause can be used for the temporary stop, here you can enter how many seconds. |
| There are 2 limitations however : |
| * The maximum distance you can enter is 320 meters. (=32 cells into each direction). |
| * There is a maximum of 50 waypoints. Try to use 1 waypoint for a long straight track, because you need more waypoints for the turns/curves in the track. |
|
 |
| picture 7 - Example of waypoints for a server controlled mover in the world Venice3d on position 12S 6E |
|
|
|
| Now it's constantly testing with the mover and see if the several controlled mover followed the path that you want, sometimes you need to put a larger value for X , sometimes a smaller for the Z. But this problem can be solved by using the waypoints calculator (see below this page). |
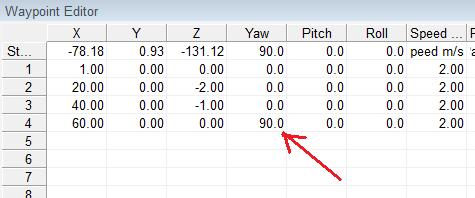
| When you have finished with the track in your waypoints editor, you will still have the problem that the mover turns around. Test and check out first how much the mover turns around at the end of the track. If you see that the mover makes a turn of 90 degrees, then go to the waypoint editor and enter on the last line of the YAW column the value of 90 (degrees). (see picture 8) |
| Then test the mover track again, if the mover still turns around at the end, then enter the value -90 instead. When this is ok , the several controlled user is ready. |
| |
| Now you can start making you own server controlled mover, the procedure will be the same, but all the values will be different. It might happen that the rotations will be 180 degrees or only 45 degrees, this depends on the mover model as well. |
|
 |
| picture 8 |
|
|
|
| 5. Tool (optional) : Waypoints calculator |
| The waypoints calculator is an Excell-document made by TenYearsGone(#378183), and is a tool which makes it easier in adding the values in the X Y and Z columns of the waypoint editor. |
| The Excell-file can be downloaded on the Facebook page of Happy Valley, and has been posted in 2013. (17 nov.2013) (+example on 7 dec.2013)., and on Facebook AWOfficial (8 nov.2013) |
| |
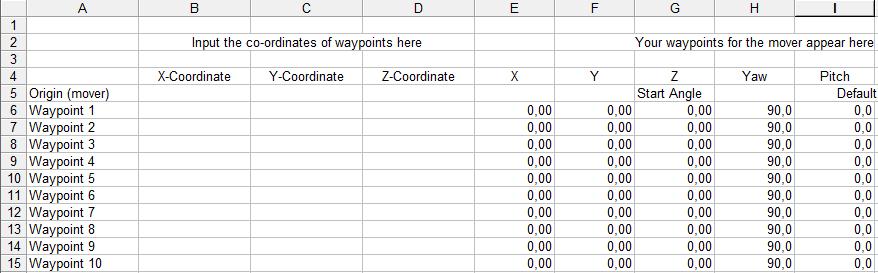
| Now this is how it works. We will use the example of the server controlled mover in Venice3d (see picture 7) and will check if it works correctly. When we open the Excell-file we will see columns with still no values in it. (see picture 9) On line 5, you have to enter the coordinates for the origin (mover). You will find these coordinates on the first line of the waypoint editor (see picture 7) and you enter these values on line number 5 (see picture 10). |
| Now we start building objects in the world which indicate the direction/track in which the mover has to navigate. In this example we used the soccer1-object. (see picture 11). We right click upon the first soccer1-object and see the location of the object : X-66 Y0 Z-123.5 and we enter these values in columns BCD for waypoint 1 in the waypoints calculator (picture 10). |
| We right-click upon the second soccer1-object (see picture 11) and we see the location : X-43.5 Y0 Z-129 and we enter these values for waypoint 2 in the waypoints calculator (picture 10) . At the same time, you will see other values in the columns E F and G. |
| Now we click upon the third soccer1-object which is at a wider distance, and we add the values 126.5 0 131 in columns BCD .(picture 10). And we see new values in columns E F and G. When you compare these values with line 4 of the waypoints editor (picture 7) , you can say that the waypoints calculator works correctly. |
| |
| Normally you start with a blank waypoints editor and a blank waypoints calculator spreadsheet. First you enter the values in columns B C and D of the waypoints calculator. Then you will see values in columns E F and G of the waypoints calculator, which must be entered now into waypoints editor. Then you test with the mover and there should be no problem. |
|
 |
| picture 9 - waypoints calculator |
 |
| picture 10 - waypoints calculator |
 |
| picture 11 - soccer1-objects (as waypoints). |
|
|
|
| 6. Multiple users on 1 mover |
| Also with server controlled movers, you can join with another user upon 1 mover. In the object properties of the mover, when deselecting "single user", the option "add on bump" will be automatically activated. There will be a 10 seconds delay before the mover will start to navigate, this is the time needed for other users to join the ride. |
| |
| 7. Looping |
| This is another option in the object properties of a server controlled mover. When you make a track with the waypoint editor, you can make a track and end again at the starting point. When navigating ing with the mover, the track will be constantly repeated. |
|
|
|
|
|
|
|
|
 |
|
|


