 |
|
| |
 |
Action commands |
|
 |
 |
| |
Teleport * Warp |
| |
|
|
|
 |
|
One of the first things you learn in Activeworlds is teleporting to another world or to a specific location inside a world . This can be done in different ways : |
| 1. in the menu bar , you will find the menu item "Teleport" |
| 1a. enter the world name and/or the coordinates of the location where you want to go |
| 1b. store a world/location as your home location (instead of the standard home) |
| 1c. store a world/location into the tabsheet "teleport" list (which you can rename) |
| 1d. store a world/location on exit : when re-entering aw, you will enter on this location |
| 2. in the toolbar, you can teleport back or forward again, or go to the home location |
| This is the same as if you are surfing on webpages , but here we have 3d worlds. |
| 3. in the tabs screen (F9) you can also teleport by choosing :: |
| 3a. tabsheet "worlds" : double clicking upon one of the worlds |
| 3b. tabsheet "teleport" : clicking on one of the stored teleports |
| 3d. tabsheet "contacts" : by joining a contact (or by being invited by a contact) |
| 4. bot programs : some bot programs can teleport your avatar , when you type a specific word or command in the chat window. |
| 5. Hud screens : can be used as teleports as well (example in the world Winter) |
| 6. Stargate : this object is in fact an advanced teleport system, which is activated after clicking one of the teleport signs. |
| Now on this webpage we will explain how you can make your own teleports upon objects, and there are 2 ways of doing this : |
| 7. teleport by clicking on an object with the teleport action command |
| 8. teleport by bumping/walking with your avatar against an object which has the teleport action command |
|

Stargate in Alphaworld on position 2000N 7005E |
|
|
| 1. Teleport to another world |
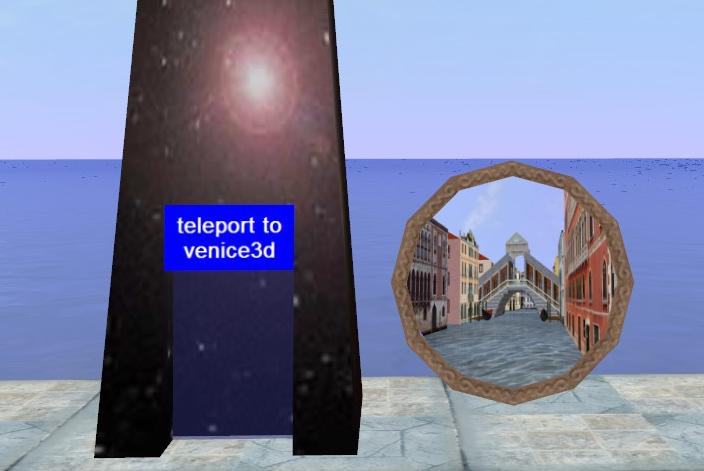
| You can add a teleport command on any object you want, but if you want to make clear that there is a teleport , then you better use a sign object, or use a typical teleport object. If you want to make a teleport to another world, you just add the world name. |
| tport (this object is a typical teleport object and it's a sign object as well) |
| create sign "teleport to venice3d" ; activate teleport venice3d |
| The teleport will only work if the world is "open" and "online" in the worlds list. |
| 2. World entry point |
| When teleporting to another world, you will be teleported to the world entry point . This is not necesarily the location 0N 0W of the world , but it is the entry point location decided by the world owner. As a world owner, you need to go to :"Options - World - Features - Entry Point". There you will see the current world entry coordinates. As a world owner , if you want to change the world entry point, then you should move your avatar to the desired location and then click in this menu upon the button underneath "set to my location" and you will see that the entry point coordinates have changed. And you need to confirm this and click upon "apply" or upon "ok". |
|

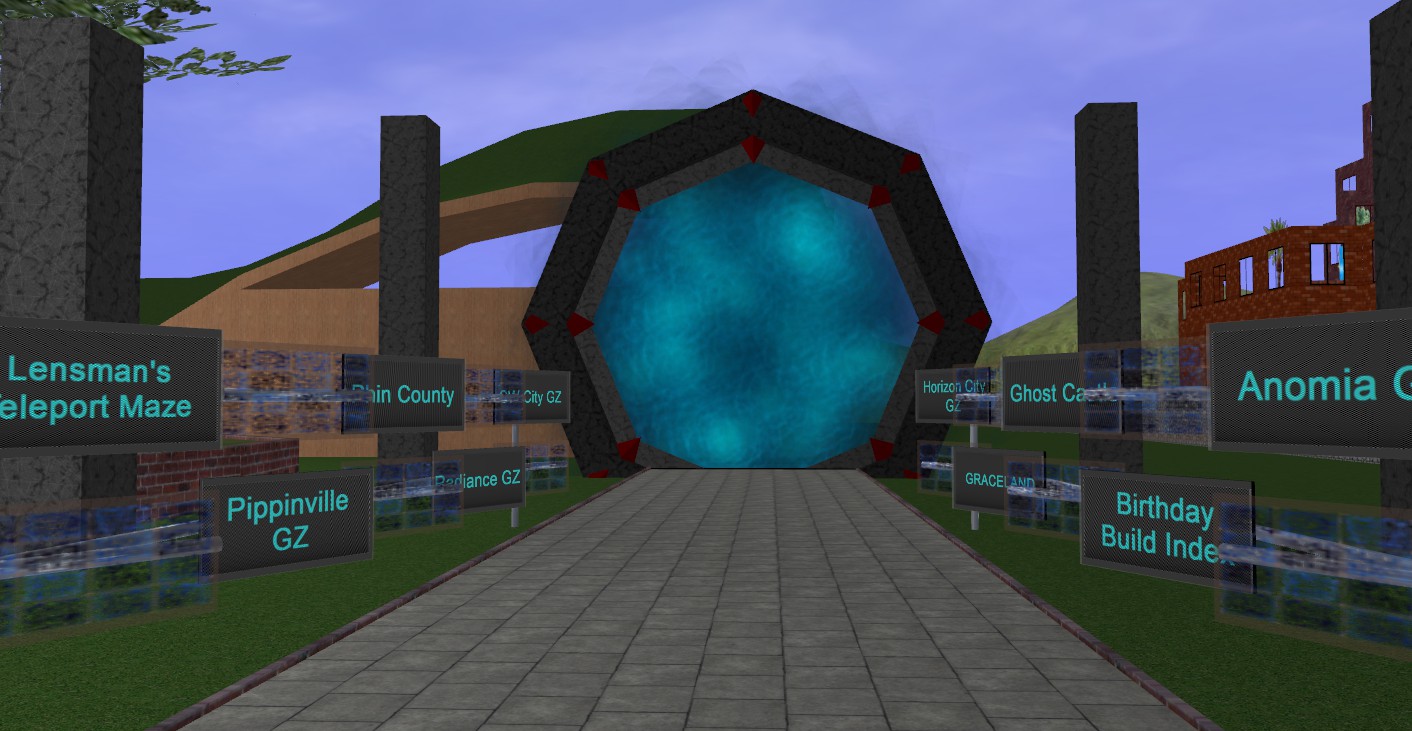
Lensmans teleport Maze in Alphaworld on pos. 1990N 7000E. This network of teleports brings you to a lot of popular places in Activeworlds. |
|
|
 |
 |
|
|
| 3. Local teleport (in the same world) |
| You can also make a teleport with coordinates, we mean with that teleporting to a specific location inside the world. |
| hp-tport (also a typical teleport object) |
| manhole1 (= the circular object inside the tport) |
| create texture cultures5 , scale 2.2 ; activate teleport 7.07N 2.05E 1.88a 87 |
| For this action command , it's a local teleport which remains in the same world. As you can see, the coordinates are very detailed : 1.88a indicates the altitude where the avatar will arrive .and 87 is the direction in which the avatar looks going from 0 degrees until 360 degrees. This coordinates are obtained by using the "set to my location"-button, just as if you would create a new world entry point , but without clicking upon "apply" or "ok". |
| |
| The object manhole1 suits with the hp-tport object, but it's not a picture object, you need to use a texture of the object path (in this case the picture was uploaded in the OP). |
|
| Make a teleport with coordinates. |
| 1. Create a sign object or a teleport object and type in the action command "activate teleport" |
| 2. Bring your avatar to the destination and make your avatar look into the right direction. |
| 3 . Go in the menu to :"Options - World - Features - Entry Point" and click upon the "set to my location"-button and the new location appears in the Entry Point field.. |
| You will see a text containing the position (N-S-E-W coordinates) , the height and the direction in which the avatar looks. Do NOT click upon apply or ok , but do this : |
| 4. Select with your mouse cursor the text of this new location and copy this text (CTRL+C) |
| 5. Go back to your teleport object and go to the action field, go with your cursor after the text "activate teleport" and paste (add) this text in the action command (CRTL+V) |
| 6. Now try it out the teleport. |
|
|
|
| 4. Specific location (to another world) |
| In this action command , there is a teleport to another world, followed by a specific location. The teleport will not work if the world owner of that world has disabled "local teleports" in the world settings. |
| hp-tport |
| pictwll3 (= square object inside the tport, with a circular mask) |
| create texture show12 mask=manho1m , scale 0.7 ; activate teleport mars 1918.29N 998.24W 0.36a 278 |
| In this example, we have used the object picwll3 , which is a picture object. The mask manho1m has a circular shape. However, if you use a mask, you can only use textures which are part of the OP : texture "show12" is an image of the world Mars. Another possibility is using an url of a png-image in circular shape instead of using a mask in circular shape. |
| For the next example, we have a simple pictwll object with url image, and we used fixed coorinates : 32N 104E , we only added altitude and the direction in which the avatar need to look. |
| pictwll3 |
| create picture www.venice3d.net/images/bzastart.jpg , scale 0.7 ; activate teleport awschool 32N 104E 0.40a 266 |
|
 |
|
|
| 5A. Direction |
| The direction in which the avatar needs to look after teleporting ranges from 0 till 360 : |
| 90-> west ; 180 -> south ; 270 -> east ; 0 / 360 -> north |
| 5B. Altitude |
| The altitude is the height level where the after needs to arrrive after teleporting: |
| 1a = 10 meters : 5a = 50 meters ; 20a = 200 meters ; -20a = below sea level. |
| In the next example the avatar will be teleported 20 meters high and facing south. |
| tport |
| create sign "teleport to venice3d" ; activate teleport venice3d 16S 17W 2a 180 |
| Another important thing about using altitude is for the world entry point: when you are teleporting or entering into your world, all objects still have to load, also the objects where the avatar will land. The consequence could be that the avatar arrives somewhere under the ground or below sea level ,or gets stuck into an object that was just loading. The solution is to make the teleports and world entry point at an alitude of 200 meters or more. The avatar will go down (gravity in the world) but meanwhile the objects will have loaded. |
|
| Make a teleport with distances. |
| sign3 |
| activate teleport +0 +5 |
| =Teleport to 50 meters at the west from the sign object. |
| activate teleport |
teleport from the sign object |
| -1 +0 |
10 meters to the south |
| +1 +0 |
10 meters to the north |
| +0 -1 |
10 meters to the east |
| +0 +1 |
10 meters to the west |
|
| Invisible teleports. |
| In some cases you can make an invisible teleport object, where the visitor will not see that there is a teleport object , which will relocate the avatar (e.g. in a haunted halloween house , or in a game world, where you could be passing through an invisible object (= bump teleport) and arrive in. a hidden room with a treasure or teleported into a jail or tomb). But the most common use of using invisible objects is by using the warp trigger ,and use it making a in a "sequence of warps". |
|
|
|
| 6. The warp command |
| With the teleport command, the avatar arrives immediately on the new location , whereas with the warp command, the avatar slides towards the new location. With the teleport command you can teleport to another world, whereas with the warp command you can only inside the world. |
| In the next example the tport object is located at 16s 16w and will bring you 40 meters to the west |
| tport |
| create sign "move to the west" ; activate warp 16.00S 20W 0.5a 90 |
| With bump warp you have the same effect, if your avatar walks against the object. |
| create sign "move to the west" ; bump warp 16.00S 20W 0.5a 90 |
| If you choose a larger distance for your bump warp , then you will see that the warp has more speed. This is also an important item for making a warp train. |
| create sign "move to the west" ; bump warp 16.00S 200W 0.5a 90 |
|

TriCity Monorail network in AlphaWorld 25221N 24503W. |
|
|
| 6. Warp animation : use a "sequence of warps" |
| In fact this warp animation is not only for a train or monorail , but this building technique can be used for any kind of vehicle. Only disadvantage is that you will see running your avatar instead of see moving a vehicle, but don't worry, there are mover objects for that and you will see about this later. |
| There are several methods of making this warp animation, but they have these same building rules in common : |
| 1. The animation consists of a sequence of objects with the warp command. Make sure that each warp reaches and covers the next object , this will ensure that the warps continue on until the final destination. |
| 2. About the size of the warp objects : make sure that your avatar will bump against the objects, so make them big enough. But not too big, because when you are not on the warp track , you shouldn't bump against such an (invisible) object. You can solve this by locking up the warp objects inside corridors (e.g. the Tricity monorail.) |
| 3. The larger the warp distance, the higher the warp speed will be. |
| 4. When warping from 1 point to another , you will notice that the speed gets slower when you almost reach the final destination. If you use several warp objects, you will also notice this slower speed , but causing an irregular speed. You can solve this by putting the warp destination point at a larger distance beyond the next warp object. Then the new warp animation will start before the previous warp will get slower. |
| 5. When using a warp command, you will hear a warp sound. When using a teleport, you will hear a teleport sound. Those sounds are default sounds, and can be changed in your object path ( deport1.wav and warp1.wav ). |
|
| Method 1 : warps with distances |
| For this example we have the monorail in TriCity. The monorail is made with glass corridors : the warp objects are locked inside. The animated texture "warp" is often used for warps and teleports. In this example we don't use coordinates, but here we use the distance in which the avatar will move (we already swa that you can also use this for teleports) : |
| bump warp |
the avatar will move: |
| -1 +0 |
10 meters to the south |
| +1 +0 |
10 meters to the north |
| +0 -1 |
10 meters to the east |
| +0 +1 |
10 meters to the west |
|
| animate4.rwx |
| create texture warp ; bump warp -1 +0 |
| The other panels in the monorail are made invisible. Each warp object is at a distance of 10 meters, so this warp will work. |
| pp17.rwx |
| create visible no;bump warp -1 +0 |
| Here the warp will go 50 meters to the south and you will have more speed : |
| create visible no;bump warp -5 +0 |
| This is the easiest way of making a warp train animation, but if you have to go upwords or in a circular or irregular diagonal line, then it"s easier to use coordinates.. |
|
|
|
| Method 2 : warps with coordinates |
| Like we have seen already , we make the coordinates for the destination points by doing this : "Options - World - Features - Entry Point" and click upon the "set to my location"-button . The entry point coordinates will be replaced. Then copy and paste these coordinates into the warp action command . |
| In this example the soccer1 objects are the destination points for your avatar. The soccerballs won't be used for building, but it"s just to show in this example where you have to position your avatar . The pp16 objects will be made invisible in the action command and will contain the warp command with the destination points. |
| We see upon the picture that there is no soccerball between the first and the second pp16-window. The reason is simple : when using several warps, the new warp must begin before the last warp has been finished . If the destination point should have been before the 2nd warp, then the warp would have stopped there (too soon). If this is clear to you, then continue with this: Put your avatar at the position of the second soccerball, and store this position with the "set to my location button" and we copy and paste these coordinates and type this action command in the first pp16 window : |
| pp16 |
| create visible off ; bump warp 19.20S 15.88E 0.00a 180 |
| Now put your avatar at the position of the third soccerball. Now rotate your avatar so that the avatar keeps looking in the middle of the path.. Then save these coordinates with the "save this my location" button and copy them into the second pp16 window. |
| create visible off ; bump warp 19.78S 15.22E 0.00a 102 |
| Now go to the first soccerball and go forward with your avatar through the invisible pp16-window and check if the warp works like it should . |
| Now you can continue with the fourth position (soccerball) and store these into the third pp16 window , until you have made the whole warp track.... |
|
 |
|
|
| Starting with a warp |
| Normally a warp starts by clicking upon the warp object (trigger "activate") or by walking withyour avatar against the warp object (trigger "bump"), but the warp command can also be started by the warp object itself , by letting the warp object move and bump against your avatar : |
| wall003 |
| create move 0 0 20 loop time=5 ; bump warp +2 +0 |
| or also after clicking the object , the object moves and bumps against your avatar... |
| activate move 0 0 20 loop time=5 ; bump warp +2 +0 |
|
|
|
|
 |
|
|
|
 |
|
|


